Thursday, September 29, 2011

Using Fetch Expression from the Plug in code. CRM 2011

Fallowing, are the steps that we can make use of while executing the Fetch XML query.

1) Create a fetch xml query with the help of Advanced find option and format as in the below code

2) Call service.RetrieveMultiple and pass on the Fetch Xml query to the Fetch expression as in the below code. This should give you the result.

string fetchAccountType = @""+
""+ 
       ""+
       ""+
       ""+
       ""+
       ""+
       ""+
       ""+
       ""+
       ""+
       //Passsing a parameter (accountId) to the fetch xml query
       "" +
       ""+
       ""+
       ""+
       ""+
       "";
                var entityCollection = service.RetrieveMultiple(new FetchExpression(fetchAccountType));
                string accountType = string.Empty;
                if (entityCollection.Entities.Count > 0)
                    if (entityCollection.Entities[0].Attributes.Contains("new_name"))
                        accountType = entityCollection.Entities[0].Attributes["new_name"].ToString();     

Tuesday, May 31, 2011

CRM Upgrade from 4.0 to 5.0

UPGRADING FROM DYNAMICS CRM 4.0.

1. Get a full backup of your current Organization SQL Server database on Dynamics CRM 4.0.
2. Restore the DB backup on the new SQL Server instance used for Dynamics CRM 2011.

3. Open Deployment Manager console (Start->All Programs->Microsoft Dynamics CRM->Deployment Manager)

4. Within Deployment Manager, go to Organizations->Import Organization…

5. Select the SQL Server instance and the Organization database to import. This corresponds to the restored DB on the SQL Server 2008/2008R2 instance used for Dynamics CRM 2011.
If everything is on the same box as this case, you may already have the values automatically inferred.

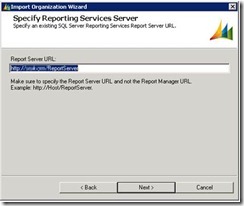
6. Then, the Import Organization Wizard will ask for some parameters regarding to the organization itself, such as the display name we want to use.


7. After setting the above parameters we will be asked about users mappings, this is, how the users which are present on the organization to be imported are mapped to CRM accounts.
If you are migrating from a Dynamics CRM 4.0 deployment which is on the same domain (as it is this case), you would prefer just to allow CRM 2011 to automatically map the users and create the new users as needed.
For doing so, just click on the first option and press 'Next'.


8. The result of the auto-mapping:

9. If the domain user account you are running the application is not mapped with any user with the System Administrator security role, you will be prompted with the following message:

This means you will have to manually map one of the accounts to the current user you are logged on. Do this by just selecting the user and clicking on 'Browse...' to specify the current user account.

10. On next step, some system checks are carried out again:

11. The 'Ready to Import' dialog comes up!. Just click on 'Import' to start the migration!

12. The import runs (it takes some time, depending on the amount of data and customizations)...

13. When the import process finishes successfully, it displays the following message:

14. If you want to set this imported organization as your default one, just get back to Deployment Manager->Organizations , refresh data (if you had the app open while importing) and then right click the imported organization and select 'Set as Default Organization'

If you are not going to use the default organization created during the CRM 2011 installation, I would suggest deleting it, also by right-clicking on the organization name.
15. Now, just enter the URL on Internet Explorer and verify your data and customizations!

At this point, you already installed CRM 2011 and successfully migrated an existing CRM 4.0 organization.

Friday, April 15, 2011

Label in CRM 4.0

In CRM 4.0, if you want to add a Label on the form/in the section, the easiest way to achieve this would be, to add a text box, disable it and remove the border.

Add the below function in the on load of the form.
//For adding a label “Testing the heading”
ConvertControlToLabel( "new_textboxId"); // “new_textboxId” is the Id of a textbox

function ConvertControlToLabel( controlId ){ 
 var control = document.getElementById( controlId ); 

 if( control ){ 
  control.Disabled = true; 
  control.style.border = "0px"; 
 }
}
One other quick tip:
If you want to increase/decrease the width of the label to fit in to accommodate the label text in to one line, you can double click on the section and change the field width default value of 115 pixel to the appropriate you want.

NOTE: This is an unsupported way of implementation.

Friday, February 18, 2011

IFD Authentication OR AD athentication?

Brief introduction to IFD and deplyment steps:
IFD allows the customers to configure their CRM system to be reachable from outside the intranet. It might be internet or outside of the firewal.

The main difference when using IFD vs. typical on-premise deployment is how users are authenticated.

When using the on-premise version, IIS handles most of the authentication via integrated windows authentication.

For the IFD, we need to make use of custom CRM Authentication handler modules while setting up. In IFD, the web site is opened for anonymous access and the authentication relies on the presence of the CRM ticket cookie. This cookie is obtained by starting off from a sign-in page.

The Internet Facing Deployment steps:
In order to access the custom pages via AD authentication and IFD Authentication following are some of the main steps.

1) Place your build code in the IFV Folder
2) The Custom ASP.net pages must be in side the CrmAppPool

Your published folder should contain
a) custom aspx page with an assembly reference
b) Resource folder in case if you have used any.
c) bin folder, which contains the assembly

How to register the assembly name?
Go to the properties on the Webapplication project and set the Assembly name.
Register the assembly name in the .aspx page at the top. For example ()

4) Add the organization name to the querystring
5) Use the CrmImpersonator class. All access to the Crm web services needs to be wrapped within the using (new CrmImpersonator()) block.
6) Use the ExtractCrmAuthenticationToken static method. This is necessary to get the context of the calling user.
7) Use CredentialCache.DefaultCredentials to pass AD credentials to the Crm web services.

Accessing the page from an internal address:
http://[server]/[orgname]/ISV/TestFolder/TestPage.aspx

Accessing the page from an external address:
http://[orgname].[server name (Fully qualified domain name)]/ISV/TestFolder/TestPage.aspx

Hope this helps,
Chaitanya...

Wednesday, January 26, 2011

Bing Map Integration with CRM 2011

Integrating the BING Maps in MS CRM 2011:

1) Create an account in Bing map
2) Download the SDK
3) Understand the REST architecture
4) Integrate the MAP using the REST architecture

Understanding the basics of REST architecture:

What is Rest?
Representational State Transfer : REST is a way to access documents and resources using a simple remote software architecture, represented by an API. The Web (World Wide Web) is an application of the REST architecture.

This architecture is defined as follows:
- States and functions of a remote application are considered as resources.
- Each resource is only accessible using a standard address. These are hyper links. Under HTTP these are URIs.
- Resources have a standard interface in which the transactions and data types are precisely defined. XML or JSON for example, or HTML.

RESTful web services:
A RESTful web service (also called a RESTful web API) is a simple web service implemented using HTTP and the principles of REST. It is a collection of resources, with three defined aspects:

1. the base URI for the web service, such as http://example.com/resources/
2. the Internet media type of the data supported by the web service. This is often JSON, XML or YAML but can be any other valid Internet media type.
3. the set of operations supported by the web service using HTTP methods (e.g., POST, GET, PUT or DELETE).

What is JSON?
JSON (JavaScript Object Notation) is a lightweight data-interchange format. It is easy for humans to read and write.
JSON is a text format that is completely language independent but uses conventions that are familiar to programmers of the C-family of languages, including C, C++, C#, Java, JavaScript, Perl, Python, and many others. These properties make JSON an ideal data-interchange language.

JSON is built on two structures:

A collection of name/value pairs. In various languages, this is realized as an object, record, struct, dictionary, hash table, keyed list, or associative array.
An ordered list of values. In most languages, this is realized as an array, vector, list, or sequence.
These are universal data structures. Virtually all modern programming languages support them in one form or another. It makes sense that a data format that is interchangable with programming languages also be based on these structures.


Ah lots of theory!, Lets start in action.Integrating the Map in CRM 2011.

1) Create a HTML resource file like the one below.(the goal is to show the Account (In CRM terms) on the map)


<!DOCTYPE html PUBLIC "-//W3C//DTD XHTML 1.0 Transitional//EN" "http://www.w3.org/TR/xhtml1/DTD/xhtml1-transitional.dtd">
<html xmlns="http://www.w3.org/1999/xhtml">
<head>
    <meta http-equiv="X-UA-Compatible" content="IE=8" />
    <title>Bing Maps REST with Jquery</title>
    <script type="text/javascript" src="http://ecn.dev.virtualearth.net/mapcontrol/mapcontrol.ashx?v=6.2"></script>
    <script type="text/javascript" src="http://ajax.googleapis.com/ajax/libs/jquery/1.4.2/jquery.min.js"></script>
    <script type="text/javascript" src="ClientGlobalContext.js.aspx"></script>
    <script type="text/javascript">
/**************************************************************************
This Function is for getting an object Id from the CRM
        IMP: Pass record object-type code and unique identifier as parameter 
        option is selected in the CRM.
By doing this you will get the context obj ID from the CRM.
Parse the URL to retrieve the GUID as in the below code.
**************************************************************************/
        var objId;
        function getParameters(values, unescapeValues) {
            var objArr;
            var parameters = new Array();
            var vals = ('?' == values.charAt(0) ? values.substr(1) : values).split("&");
            for (var i in vals) {
                var entityIdArr;
                objArr = vals[i].split("=");
                if (objArr[0] == 'id') {
                    objId = objArr[1].substr(3, 36);
                }
            }
        }

/**************************************************************************
This Function is for constructing the JSON object and 
        retrieve the result from the web service
**************************************************************************/
        var ODATA_ENDPOINT = "/XRMServices/2011/OrganizationData.svc";
        var context = Xrm.Page.context || GetGlobalContext();
        var serverUrl = context.getServerUrl();
        
/**************************************************************************
Constructing the JSON object and query 
**************************************************************************/
        function loadMapfromCRM() {
            getParameters(location.search, true);
            if (objId != null) {
                retrieveAccountRecord(objId);
            }
        }

        function retrieveAccountRecord(Id) {
            var retrieveAccountReq = new XMLHttpRequest();
            retrieveAccountReq.open("GET", ODATA_ENDPOINT + "/AccountSet(guid'" + Id + "')", true);
            retrieveAccountReq.setRequestHeader("Accept", "application/json");
            retrieveAccountReq.setRequestHeader("Content-Type", "application/json; charset=utf-8");
            retrieveAccountReq.onreadystatechange = function () {
                retrieveAccountReqCallBack(this);
            };
            retrieveAccountReq.send();
        }

        function retrieveAccountReqCallBack(retrieveAccountReq) {
            if (retrieveAccountReq.readyState == 4 /* complete */) {
                if (retrieveAccountReq.status == 200) {
                    //Success
                    var retrievedAccount = JSON.parse(retrieveAccountReq.responseText).d;
                    address = retrievedAccount.Address1_City + "," + retrievedAccount.Address1_StateOrProvince;
                    map.Find(null, address, null, null, 0, 1, false, false, false, false,
                    function (shapeLayer, results, places, moreResults, error) {
                        var place = places[0];
                        var pushpin = new VEPushpin('1', place.LatLong, //latitude, longitude
                                                    'you can place your icon resource url as you see in the webresource', 
                                                    retrievedAccount.Name, //Title
                                                    address  //Notes
                                                    );
//For adding the pushpins
                        map.AddPushpin(pushpin);

//For setting the Zoom level
                        map.SetCenterAndZoom(place.LatLong, 7);

                    });
                }
                else {
                        errorHandler(retrieveAccountReq);
                        alert("retrieveAccountReqCallBack function failure END");
                }
            }
        }
    </script>
</head>
<body>
    <div id="map" style="position:absolute; top:0px; left:0px; width:100%; height:100%;"/>
</body>
</html>
<script type="text/javascript">
    //Load the map
    var map = new VEMap("map");
    map.SetCredentials("YOUR CREDENTIALS<KEY>");
    map.LoadMap();
    
    //Resize the map
    window.onresize = function (event) { map.Resize(document.body.clientHeight); };
    window.onresize(null);
    loadMapfromCRM();
</script>


2) Go to Customizations -> Web Resources -> Add a HTML new web resource and choose the one you created as above

3) Create a tab in one of the entity forms and add the Web Resource and *IMPORTANT* select an option "Pass record object-type code and unique identifier as parameter"

4) Thats all yours! you can test the MAP.

Wednesday, December 29, 2010

Microsoft Dynamics CRM 2011

Here is some of the pondering thoughts for exporting and Importing options provided in CRM2011.

Concept of Solution in 2011:
Think of this way, a Solution is a container for the following items:
1. Custom Entities
2. Plugins
3. Customizations
4. Web Resources (May be Images, JavaScript files etc...)

There are two types of solution:
• Managed Solution :(This is locked and does not allow you to change.
Used only at the time of final deployment)
• Unmanaged Solution :(You can think of a pointer, when a change happens
to one of the entity in one of the solution, the other
solution using the same entity will also get affected)

Characteristics of a solution:
1. Publisher: Each solution is associated with a publisher
2. Version Number : very important in installing and uninstalling process
3. Unique Prefix : just like New in CRM 4.0
4. Solutions are unmanaged by default

Differences between Managed and Un Managed Solutions:
Unmanaged Solution
1. Container that holds references to the components.
2. Multiple solutions can reference same components.
3. Solutions are unmanaged by Default.
4. When Solution deleted only the solution ref from the database gets deleted and will not affect the changes done in any of the customizations/Plugins/web Resources.
5. Cannot be uninstalled.

Managed Solution
1. Designed for final distribution
2. Must be exported as managed
3. Cannot be modified and cannot be exported
4. When Solution Deleted, Entities/Components/web Resources and related data gets deleted permanently.
5. Can be uninstalled
6. Changes performed by the solutions are undone

Possible Scenarios of Import and Export process:
Scenario 1: New Deployment: Version 1.0.0.0
1. Export as a managed solution
2. Publish before you export your managed solution
3. Also, possible to export the system settings like Auto numbers, ISV…
4. Create a backup of Customization
5. From the Target Organization Import the Managed Solution.
a. This takes care of registering the plugins by choosing an option while
import.
b. This takes care publishing too, meaning once imported it automatically be
published.
6. Import would not succeed for managed solution from where it has been created.

Scenario 2: Update/Upgrade to a new version of deployment: Version 1.0.0.1 (SAME Solution name and same Publisher)
1. Once done with the changes to any of the components in the solution,
2. Follow the same steps explained in the Version 1.0.0.0, and keep in mind to change the Version Number to Version 1.0.0.1
3. Once you Import your managed solution from the Target organization the process is quite intelligent in identifying your Solution upgrade version by the solution name.

Scenario 3: Patch version of deployment: Version 1.0.0.0 (DIFFERENT Solution
name and same Publisher).
1. Create a solution with a different name
2. Add the components on which the changes are required
3. Associate the Same Publisher
4. Follow a different versioning format like Version 1.0.0.0
5. Follow the same steps explained in Version 1.0.0.0.

Uninstalling Option:
1. Deleting the managed Solution from the target organization would basically uninstall the selected solution.
2. Let’s say if we have followed a few iterations, for example if we have already reached a Version 1.0.0.5 starting from Version 1.0.0.0. in order to rollback to Version 1.0.0.2 we just need to go follow the same Import process and choose the Version 1.0.0.2 while importing. This would basically bring back the changes to the Version 1.0.0.2.

Wednesday, November 17, 2010

Adding Prerequisites in to Visual Studio 2008

o Bootstrapper Manifest Generator Tool URL: http://code.msdn.microsoft.com/bmg/Release/ProjectReleases.aspx?ReleaseId=1567
(is used for generating the manifest file in the Bootstrapper folder of the VS2008 environment)

The above tool will create a folder and add the manifest files to the following location:

C:\Program Files\Microsoft SDKs\Windows\v6.0A\Bootstrapper\Packages

The folder should have the following files in it:
For example if your adding the SQL Exress 2005 as a prerequisite to the VS 2008,

The tool creates a folder based on the project name provided while creating the
manifest file.

Creating Custom Packages
--------------------------------------------------------------------------------

There are some cases in which you do not have to create a package for your redistributable. Typically, you only have to build packages for shared components or system components, which have to install files to the GAC, perform global registration, or make up a Windows Service.

You should ask the control provider whether you can ship the redistributable file together with the application. If a simple copy operation would be sufficient to redistribute the prerequisite component (for example, if it has no dependencies), you do not have to create a package. Just make sure that the file is included in the setup or that it is set to Copy Local. (The file's Copy property in Properties View should be set to True.)

You should also determine whether you have to use an installer. If so, use a Bootstrapper package.

To create a new component package, you have to supply:

The redistributable component in the form of an EXE or MSI file.

The product manifest, product.xml, which contains any language-neutral metadata for the package. This contains metadata common to all the localized versions of the redistributable component.

The package manifest, package.xml, which contains language-specific metadata; it typically contains localized error messages. A component must have at least one package manifest for each localized version of that component.

How to use the Tool?

Step1:Open the tool and create a project


Step2: Setting up the Manifest project


Step3: Selecting an .exe file


Step4: Final manifest project file


Step5: Build output


Following are the few software download links to configure the Prerequisites in the VS2008

o MDAC Download URL: http://www.microsoft.com/downloads/en/confirmation.aspx?FamilyId=9AD000F2-CAE7-493D-B0F3-AE36C570ADE8&displaylang=en
o SQL Express From FTP: ftp://192.168.1.6/technical/Installables/Microsoft/SQL/SQL 2005 Express SP3

o Crystal Report download URL: http://resources.businessobjects.com/support/additional_downloads/runtime.asp#09 (Follow the attached word document to convert the file to .msi format)

o WSE 3.0 Runtime Download URL: http://www.microsoft.com/downloads/en/details.aspx?FamilyID=9e59c3fb-e7bc-4d91-908e-411a8d329f3d&displaylang=en

Some helpful links:

• http://stackoverflow.com/questions/1334436/adding-custom-prerequsites-to-visual-studio-setup-project
• http://msdn.microsoft.com/en-us/library/ms165429.aspx
• http://msdn.microsoft.com/en-us/library/ms165429(v=VS.90).aspx