Tuesday, November 8, 2011

Retrieving all the record from an entity

By default, the RetrieveMultiple method retrieves only 5000 records, this is a limit from the standpoint of performance. In order to retrieve more than 5000 records, please fallow the pattern explained in the below code.

I have written a console application to retrieve all the Account records. The below code is a method to achieve that. The main logic in retrieving all the records is by passing the PageInfo object to a QueryExpression.
private static void GetAllActiveAccounts(OrganizationServiceProxy service)
{
EntityCollection retrieved;
const int servicePageSize = 5000;
int pageNumber = 1;
string pagingCookie = string.Empty;
const int pageSize = servicePageSize;
int totalRecordsCount = 0;

do
{
var cols = new ColumnSet();
cols.AddColumns(new string[] { ACCOUNT_ID, ACCOUNT_NAME });
var filter = new FilterExpression { FilterOperator = LogicalOperator.And };
filter.AddCondition(new ConditionExpression(STATE_CODE, ConditionOperator.Equal, new object[] { 0 }));


var query = new QueryExpression
{
ColumnSet = cols,
Criteria = filter,
EntityName = ENTITY_ACCOUNT,
PageInfo = new PagingInfo()
{
PageNumber = 1,
Count = pageSize
}
};

if (pageNumber != 1)
{
query.PageInfo.PageNumber = pageNumber;
query.PageInfo.PagingCookie = pagingCookie;
}

retrieved = service.RetrieveMultiple(query);
if (retrieved.MoreRecords)
{
pageNumber++;
pagingCookie = retrieved.PagingCookie;
}

try
{
if (retrieved.Entities.Count > 0)
{
totalRecordsCount += retrieved.Entities.Count;

foreach (var accountEntity in retrieved.Entities)
{
if (accountEntity.Attributes.Contains(ACCOUNT_ID))
{
var accountId = (Guid)accountEntity.Attributes[ACCOUNT_ID];
var accountName = (string)accountEntity.Attributes[ACCOUNT_NAME];
Console.WriteLine("Account Name: " + accountName);
}
}
}
}
catch (Exception ex)
{
Console.WriteLine(ex.Message);
Console.ReadLine();
}

} while (retrieved.MoreRecords);

Console.WriteLine("Total records: " + totalRecordsCount);
}

Friday, September 30, 2011

Filtered Lookup OK Button disabled.

I was, facing a weird issue in the filtered lookup configured through the JavaScript.

This is what the issue was: I was, able to see the filter happening, But, when I open a look up, the OK button to select one, was disabled.

Solution: In the Layout Xml, I had a different Id field of another entity (Please, fallow the below line of code to find an ID). Also, if you make any typo while defining an Id field, you will face this issue (OK button disabled).
"" +

Hope, this helps.

Object Type Code in CRM 2011

Below, is the sample to get the Object Type code from the CRM 2011. Since, the object type code can be easily found from the entity record, which, may not be same in the other environment when you import the solution. We can fetch the Object Type code dynamically from the sample as in the below code.

var getObjectTypeCode = function(entityName) {
var lookupService = new RemoteCommand("LookupService", "RetrieveTypeCode");
lookupService.SetParameter("entityName", entityName);
var result = lookupService.Execute();

if (result.Success && typeof result.ReturnValue == "number") {
alert(result.ReturnValue);
return result.ReturnValue;
} 
else {
return null;
}
}

You may not find the "RemoteCommand" in the SDK, But, internally this has been in use in CRM 2011. More information to fallow...

Thursday, September 29, 2011

Using Fetch Expression from the Plug in code. CRM 2011

Fallowing, are the steps that we can make use of while executing the Fetch XML query.

1) Create a fetch xml query with the help of Advanced find option and format as in the below code

2) Call service.RetrieveMultiple and pass on the Fetch Xml query to the Fetch expression as in the below code. This should give you the result.

string fetchAccountType = @""+
""+ 
       ""+
       ""+
       ""+
       ""+
       ""+
       ""+
       ""+
       ""+
       ""+
       //Passsing a parameter (accountId) to the fetch xml query
       "" +
       ""+
       ""+
       ""+
       ""+
       "";
                var entityCollection = service.RetrieveMultiple(new FetchExpression(fetchAccountType));
                string accountType = string.Empty;
                if (entityCollection.Entities.Count > 0)
                    if (entityCollection.Entities[0].Attributes.Contains("new_name"))
                        accountType = entityCollection.Entities[0].Attributes["new_name"].ToString();     

Tuesday, May 31, 2011

CRM Upgrade from 4.0 to 5.0

UPGRADING FROM DYNAMICS CRM 4.0.

1. Get a full backup of your current Organization SQL Server database on Dynamics CRM 4.0.
2. Restore the DB backup on the new SQL Server instance used for Dynamics CRM 2011.

3. Open Deployment Manager console (Start->All Programs->Microsoft Dynamics CRM->Deployment Manager)

4. Within Deployment Manager, go to Organizations->Import Organization…

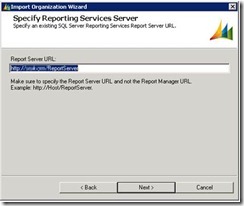
5. Select the SQL Server instance and the Organization database to import. This corresponds to the restored DB on the SQL Server 2008/2008R2 instance used for Dynamics CRM 2011.
If everything is on the same box as this case, you may already have the values automatically inferred.

6. Then, the Import Organization Wizard will ask for some parameters regarding to the organization itself, such as the display name we want to use.


7. After setting the above parameters we will be asked about users mappings, this is, how the users which are present on the organization to be imported are mapped to CRM accounts.
If you are migrating from a Dynamics CRM 4.0 deployment which is on the same domain (as it is this case), you would prefer just to allow CRM 2011 to automatically map the users and create the new users as needed.
For doing so, just click on the first option and press 'Next'.


8. The result of the auto-mapping:

9. If the domain user account you are running the application is not mapped with any user with the System Administrator security role, you will be prompted with the following message:

This means you will have to manually map one of the accounts to the current user you are logged on. Do this by just selecting the user and clicking on 'Browse...' to specify the current user account.

10. On next step, some system checks are carried out again:

11. The 'Ready to Import' dialog comes up!. Just click on 'Import' to start the migration!

12. The import runs (it takes some time, depending on the amount of data and customizations)...

13. When the import process finishes successfully, it displays the following message:

14. If you want to set this imported organization as your default one, just get back to Deployment Manager->Organizations , refresh data (if you had the app open while importing) and then right click the imported organization and select 'Set as Default Organization'

If you are not going to use the default organization created during the CRM 2011 installation, I would suggest deleting it, also by right-clicking on the organization name.
15. Now, just enter the URL on Internet Explorer and verify your data and customizations!

At this point, you already installed CRM 2011 and successfully migrated an existing CRM 4.0 organization.

Friday, April 15, 2011

Label in CRM 4.0

In CRM 4.0, if you want to add a Label on the form/in the section, the easiest way to achieve this would be, to add a text box, disable it and remove the border.

Add the below function in the on load of the form.
//For adding a label “Testing the heading”
ConvertControlToLabel( "new_textboxId"); // “new_textboxId” is the Id of a textbox

function ConvertControlToLabel( controlId ){ 
 var control = document.getElementById( controlId ); 

 if( control ){ 
  control.Disabled = true; 
  control.style.border = "0px"; 
 }
}
One other quick tip:
If you want to increase/decrease the width of the label to fit in to accommodate the label text in to one line, you can double click on the section and change the field width default value of 115 pixel to the appropriate you want.

NOTE: This is an unsupported way of implementation.

Friday, February 18, 2011

IFD Authentication OR AD athentication?

Brief introduction to IFD and deplyment steps:
IFD allows the customers to configure their CRM system to be reachable from outside the intranet. It might be internet or outside of the firewal.

The main difference when using IFD vs. typical on-premise deployment is how users are authenticated.

When using the on-premise version, IIS handles most of the authentication via integrated windows authentication.

For the IFD, we need to make use of custom CRM Authentication handler modules while setting up. In IFD, the web site is opened for anonymous access and the authentication relies on the presence of the CRM ticket cookie. This cookie is obtained by starting off from a sign-in page.

The Internet Facing Deployment steps:
In order to access the custom pages via AD authentication and IFD Authentication following are some of the main steps.

1) Place your build code in the IFV Folder
2) The Custom ASP.net pages must be in side the CrmAppPool

Your published folder should contain
a) custom aspx page with an assembly reference
b) Resource folder in case if you have used any.
c) bin folder, which contains the assembly

How to register the assembly name?
Go to the properties on the Webapplication project and set the Assembly name.
Register the assembly name in the .aspx page at the top. For example ()

4) Add the organization name to the querystring
5) Use the CrmImpersonator class. All access to the Crm web services needs to be wrapped within the using (new CrmImpersonator()) block.
6) Use the ExtractCrmAuthenticationToken static method. This is necessary to get the context of the calling user.
7) Use CredentialCache.DefaultCredentials to pass AD credentials to the Crm web services.

Accessing the page from an internal address:
http://[server]/[orgname]/ISV/TestFolder/TestPage.aspx

Accessing the page from an external address:
http://[orgname].[server name (Fully qualified domain name)]/ISV/TestFolder/TestPage.aspx

Hope this helps,
Chaitanya...